Sunday, March 24, 2013

I'm back!

I took a break from blogging in attempt to simplify my life a bit. But you know what? I love thinking about food and cooking so much that I might as well document my thoughts and experiments. If nothing else, it's a great reference for myself!

Several years ago (5?), I met a great group of ladies through an online mom's group. I hauled two kids in bucket seats (my son and the girl I watched at the time) to a stranger's house for a play group. Little did I know that it was only the beginning of great friendships. Our play group evolved to a weekly knitting night (which often doesn't involve any knitting) and this April we'll be going on our third annual "knitting retreat" together. A little over a year ago, we decided to introduce the husbands and try out a dinner club and it has been great fun!

Last night was an aphrodisiac theme (ooooh la la!) and we ate amazing mussels, steak with chimichurri, asparagus and crusty bread with honey butter. The host was whipping up some fantastic champagne and Crème de cassis cocktails. Oh man was it good! Mike suggested we do something with avocado (who knew it was an aphrodisiac?!) and mentioned avocado ice cream. I was quite skeptical but processing ripe avocados with some cream and sugar creates this magically delicious and amazingly smooth ice cream. We tried out three toppings: honey, salt & lime, and mexican chocolate. I think the honey won over most people and the ice cream is incredible on it's own, too.  

Avocado Ice Cream
David Lebovitz A Perfect Scoop, by way of Two Peas in a Pod

Avocado Ice Cream

3 medium ripe avocados
3/4 cup granulated sugar
1 cup sour cream
1/2 cup heavy cream
1 tablespoon freshly squeezed lime juice
Pinch of salt

Slice open the avocados, remove the pits, and scoop out the flesh. Put the avocados in a blender of food processor. Add the sugar, sour cream, heavy cream, lime juice, and salt. Blend until smooth.

Freeze in your ice cream maker according to manufacturer's instructions. If you like soft ice cream, go ahead and eat. If you like firmer ice cream, store in the freezer for a couple of hours before serving. 

Yield: 1 quart ice cream
 ------


Tonight we had a simple easy pizza for dinner.  I used a Boboli* crust and topped it with red sauce, goat cheese, Penzey's pizza seasoning.  After it was out of the oven, I added some arugula, a drizzle of some nice balsamic vinegar, and a few shakes of red pepper flakes.  We had a side of fruit salad and a nice cold beer along with it. 


Simple goat cheese and arugula pizza

*I have to say that I'm embarrassed about the Boboli crust.  I bought two of them a few weeks ago when I didn't have a chance to make my own pizza crust.  Sometimes you just have to fake it to make it. 

Friday, July 20, 2012

Chard and Cookies

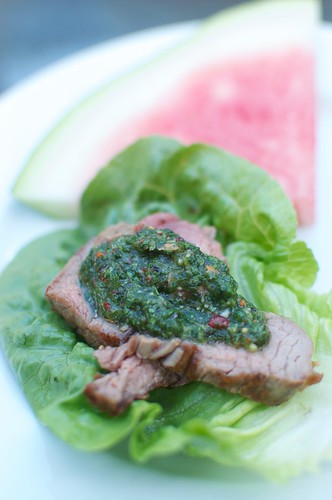
Do you ever buy something from Costco and not realize how gigantic it is until you get it home? Or is that just me?! I bought a bag (5 lb!) of Israeli couscous awhile back and I'm pretty sure it's going to last a lifetime. I found this yummy looking recipe for Israeli Couscous with Chard on The Kitchn and gave it a try (love that blog!) and it was really quite good! The kids both ate it although I'm not sure how much chard actually made it into Owen's stomach but oh well.

Israeli Couscous with Chard
via The Kitchn
Serves 2 (we doubled it)

Chard and Cous Cous

1 3/4 cup chicken or vegetable broth
1 1/4 cup Harvest Grain Blend or Israeli couscous
Drizzle olive oil
3 large cloves garlic
1 teaspoon whole white cumin
1 dried red chili pepper (optional)
4 cups chopped chard
1/4 cup chicken or vegetable broth
1 teaspoon coarse salt
1 tablespoon balsamic vinegar

Heat the broth to boiling in a small saucepan. Stir in the grains and lower the heat to a simmer. Cover and cook for about 10-14 minutes. Remove the lid and set aside.

Heat the olive oil in a large, heavy skillet over medium-low heat. Sliver the garlic and cook it on low heat with the cumin and chili pepper until soft and fragrant. Don't let it brown.

Add the chopped chard and turn the heat to medium. Saut' for about 5 minutes, or until it is beginning to wilt. Add the cooked couscous and the 1/4 cup of broth. Cook for another five minutes, stirring, until the broth has cooked off and the chard is fully wilted.

Add salt to taste, and vinegar (we drizzled vinegar on top of our individual plates since the kids didn't want any), and serve.


Whole Grain Breakfast Cookies
via All Recipes

I think the next best thing after cake (or should that be pizza?) for breakfast is cookies for breakfast. We love this recipe so much that I thought I should share. I do a few things differently as noted in the recipe below.

Breakfast Cookies

1 cup walnuts
1 1/2 cups old-fashioned rolled oats (not instant)
1/3 cup whole wheat flour
1/2 cup ground flax meal
1 teaspoon baking soda
1/2 teaspoon salt
1 teaspoon ground cinnamon
1/2 cup almond butter (sometimes I sub peanut butter or sun butter)
1/4 cup canola oil (I use applesauce)
1/4 cup blue agave nectar (I use honey - I think agave is a racket) 1/3 cup brown sugar (I've thought about skipping this and seeing what happens)
1 egg
1 teaspoon vanilla extract
1/2 cup dried cherries
1 cup semi-sweet chocolate chips

Preheat oven to 375 degrees F (190 degrees C). Line baking sheets with parchment paper (I use silpat).

Pulse the walnuts in a food processor several times to chop; continue processing until the walnuts are ground into flour; transfer to a bowl. Mix in the rolled oats, whole wheat flour, flax meal, baking soda, salt, and cinnamon until thoroughly combined.

Combine the almond butter, canola oil, agave nectar, brown sugar, egg, and vanilla extract in the food processor (I mix by hand) and process a few seconds to blend the ingredients well; transfer the almond butter mixture to a large bowl and fold in the dried cherries and chocolate chips. Mix the walnut-oatmeal mixture into the almond butter mixture (dough will be very thick).

Scoop up heaping teaspoons (mine are usually more like tablespoons) of dough, and form into balls; lay the dough balls onto the prepared baking sheets (I then flatten them a bit), about 2 inches apart.

Bake in the preheated oven until lightly browned, 8 to 10 minutes (10 minutes for tablespoon sized scoops). Remove from oven and flatten the cookies with a spatula. Allow to cool for about 5 minutes on the baking sheets before removing to finish cooling on wire racks.

Dan Dan Noodles
via Serious Eats

Here it is - one of the recipes that pops up every few weeks around here. I'm actually cooking something more than once! I think I've made these Dan Dan Noodles four times now - that might just be a record for me (actually I think I've made pasta fagioli more times and greek salad, of course). I didn't even know that Dan Dan Noodles existed until my friend Kate mentioned them on facebook! Mmmm, they're so good.

Dan Dan Noodles

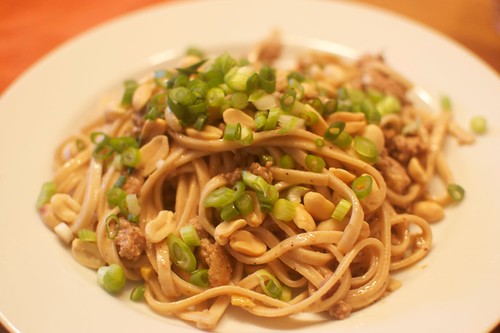
12 ounces Shanghai-style noodles or udon (I prefer the frozen udon)
3 tablespoons vegetable oil
3/4 pound ground pork (we usually use a pound)
Kosher salt and freshly ground black pepper
2 tablespoons chopped peeled ginger
3/4 cup chicken stock
2 tablespoons chili oil, or to taste
2 tablespoons red wine vinegar
2 tablespoons soy sauce
4 teaspoons tahini (sesame seed paste)
1 teaspoons Sichuan peppercorns, ground in a mortar and pestle (I found these at United Noodle)
Pinch of sugar (I sometimes forget this and it's fine)
4 tablespoons chopped roasted peanuts
1 bunch scallions, thinly sliced

Bring a large pot of water to boil and add the noodles. Cook until tender but still slightly firm to the bite, then drain and transfer to a bowl of ice water to quickly chill (I just rinse with cold water). Drain well.

In a large (12-inch) skillet or wok, heat oil over medium-high heat until smoking. Add pork and a pinch of salt and pepper and cook until partially cooked but still half pink. Add ginger and continue cooking until pork is cooked through and starting to brown.

Stir in chicken stock, chili oil, red wine vinegar, soy sauce, tahini, and sichuan peppercorns. Season with a little sugar, then bring to a boil and simmer until the sauce thickens, 7-10 minutes (usually only takes a few minutes for me).

Add noodles to the skillet and toss well in the sauce. Once noodles are heated through, taste for salt and sugar. Transfer to bowls and top with peanuts and scallions. Serve immediately.

Wednesday, July 18, 2012

Cheap Eats

In order to stay on budget yet eat mostly organic and fresh foods, we have to balance our weekly menu with some cheap eats. Typically, we eat beans (started from dry beans - so cheap!) and rice once a week and then 1-2 more meals that are on the cheap side. This week, we tried out a new recipe for cornmeal chive waffles. Mike was swearing at the waffle maker (I think he needs to get a belgian style maker and then all would be good) but they were great!

Good ol' Beans & Rice (with feta, avocado, tomatillo salsa, chips)

Beans & RIce

Cornmeal Chive Waffles via Annie's Eats

Cornmeal Chive Waffles

For the waffles:
1¼ cups all-purpose flour
¼ cup yellow cornmeal
1½ tsp. baking powder
1 tsp. sugar
½ tsp. baking soda
½ tsp. salt
¼ tsp. freshly ground black pepper
1/3 cup unsalted butter, melted
2 large eggs
1¼ cups buttermilk
3 tbsp. minced chives
2 tbsp. minced fresh parsley (we left this out)

To serve:
Salsa (we used cherry salsa that we picked up in Michigan)
Fried eggs
Minced fresh chives, for garnish

Preheat a waffle maker according to the manufacturer’s instructions.

In a large bowl, combine the flour, cornmeal, baking powder, sugar, baking soda, salt, and pepper. Whisk to blend. In another bowl, combine the butter, eggs, and buttermilk. Whisk to blend well. Stir in the chives and parsley. Add the wet ingredients to the bowl with the dry ingredients and whisk just until evenly incorporated, taking care not to over-mix.

Cook the batter in the waffle maker according to the manufacturer’s instructions. (If necessary, keep finished waffles warm in a 200˚ F oven.) While the waffles are cooking, fry eggs in a non-stick frying pan. Serve warm waffles topped with salsa, eggs, and fresh chives. Season with salt and pepper to taste. Serves 4ish.

Thursday, July 5, 2012

Eating our (beet) greens!

I love beets.  I really do!  I've loved them for as long as I remember.  A traditional meal for my family when I was a wee one was greek salad.  No casseroles or hot dishes - greek salad, people!  With beets!  I think even my "picky" sister likes beets and ate them in the greek salad as a kid. 

However, I just started learning how to eat not only the beets but the beet greens, too.  We tried this recipe with farro that includes both the beets and the greens.  Mike and I gobbled it up and had seconds.  The kids weren't so interested.  Owen finally gave in and tried the farro but was concerned about the "beet gravy" that colored everything red.  The recipe calls for feta or goat cheese but I think the salty feta really works well.  I bought some feta from the co-op and thought it had so much more flavor than the standard grocery store brand I usually buy. 

I do regret not getting a very attractive photo.  If you don't want it all to turn red, I'd sprinkle the beets on top when serving and not mix them in.  Oops!

Farro Salad with Beets, Beet Greens and Feta
via New York Times via Pinterest

Farro with Beets, Beat Greens and Feta

2 medium or 3 small beets (any color) with greens, the beets roasted, the greens stemmed and washed in two changes of water
1 cup farro, soaked for one hour in water to cover and drained
Salt, preferably kosher salt, to taste
2 tablespoons sherry vinegar
1 teaspoon balsamic vinegar
1 small garlic clove, minced or pureed
1 teaspoon Dijon mustard
1/2 cup extra virgin olive oil
1/2 cup broken walnut pieces
2 ounces feta or goat cheese, crumbled (more if desired for garnish)
1/4 cup chopped fresh herbs, such as parsley, tarragon, marjoram, chives, mint

Bring 2 quarts water to a boil in a medium saucepan. Fill a bowl with ice water. When the water comes to a boil, add salt to taste and the greens. Blanch for two minutes, and transfer to the ice water. Allow to cool for a few minutes, then drain and squeeze out excess water. Chop coarsely and set aside.

Bring the water back to a boil, and add the farro. Reduce the heat, cover and simmer 45 minutes, stirring from time to time, or until the farro is tender. Remove from the heat and allow the grains to swell in the cooking water for 10 minutes, then drain.

While the farro is cooking, make the vinaigrette. Whisk together the vinegars, salt, garlic and mustard. Whisk in the oil(s). Add to the farro. Peel and dice the beets and add, along with the beet greens, feta or goat cheese, herbs and walnuts. Toss together, and serve warm or room temperature with a little more cheese sprinkled over the top if you wish.  Serves 8 (maybe as a side, but 4ish as a main dish)


Friday, June 15, 2012

Oh summer, you taste so good.

We've been hoarding our rhubarb.  Okay, not really, but we had quite a bit to use up.  I've always been a little underwhelmed by my rhubarb creations so I hunted around for a new recipe and came across Smitten Kitchen's Rhubarb Snacking Cake.  First off, I just have to say that I don't think I've disliked anything I've made from that blog - she has amazing recipes!  And this rhubarb cake was no different.  Amazingly delicious, especially with a scoop of ice cream on top.

Rhubarb Snacking Cake (Smitten Kitchen)

Rhubarb Snacking Cake
via Smitten Kitchen

Cake:
1 1/4 pound (565 grams) rhubarb, trimmed and cut into 1/2-inch lengths on the diagonal
1 1/3 cup (265 grams) granulated sugar, divided
1 tablespoon lemon juice (psst, skip ahead and zest it for the cake before you cut it)
1/2 cup (1 stick, 4 ounces or 115 grams) unsalted butter, softened
1/2 teaspoon finely grated lemon zest
2 large eggs
1 1/3 cups (165 grams) all-purpose flour
1 teaspoon baking powder
3/4 teaspoon table salt
1/4 teaspoon ground ginger
1/3 cup (80 grams) sour cream

Crumb:
1 cup (125 grams) all-purpose flour
1/4 cup (50 grams) light brown sugar
1/8 teaspoon table salt
1/4 teaspoon ground cinnamon
4 tablespoons (1/2 stick, 2 ounces, or 55 grams) unsalted butter, melted

Make the cake: Preheat your oven to 350°F. Coat the bottom and sides of a 9×13-inch baking pan with butter or a nonstick cooking spray, then line the bottom with parchment paper, extending the lengths up two sides. (It will look like a sling). Stir together rhubarb, lemon juice and 2/3 cup sugar and set aside. Beat butter, remaining sugar and lemon zest with an electric mixer until light and fluffy. Add eggs, one at at time, scraping down the sides after each addition. Whisk together flour, baking powder, 3/4 teaspoon table salt and ground ginger together in a small bowl. Add one-third of this mixture to the batter, mixing until just combined. Continue, adding half the sour cream, the second third of the flour mixture, the remaining sour cream, and then the remaining flour mixture, mixing between each addition until just combined.

Dollop batter over prepared pan, then use a spatula — offset, if you have one, makes this easiest — to spread the cake into an even, thin layer. Pour the rhubarb mixture over the cake, spreading it into an even layer (most pieces should fit in a tight, single layer).

Stir together the crumb mixture, first whisking the flour, brown sugar, table salt and cinnamon together, then stirring in the melted butter with a spoon or fork. Scatter evenly over rhubarb layer.

Bake cake in preheated oven for 50 to 60 minutes. The cake is done when a tester comes out free of the wet cake batter below. It will be golden on top. Cool completely in the pan on a rack.

Cut the two exposed sides of the cake free of the pan, if needed, then use the parchment “sling” to remove the cake from the pan.


It's Friday Night

Tonight is Friday which means... ?  Pizza Night!  I made a new pizza tonight - the BLT pizza.  Super easy and very tasty.  I used my stand-by crust recipe, topped it with a very thin layer of mayo, scattered tomato slices, chopped cooked bacon, cubed fresh mozzarella and baked it for about 15 minutes.  After taking it out of the oven, I threw some torn arugula (from our backyard garden!) on top.  We polished off two pints of farm strawberries and most of the sugar snap peas, too.  Yum yum.  This pizza will be going in our rotation and I can only imagine the taste with garden fresh tomatoes!

BLT Pizza with Sugar Snap Peas, and Strawberries

Thursday, June 7, 2012

From Mibuna to Pea Vine

We've cooked up a few noteworthy dishes in the past week or so.  Here's the scoop!

Baked Eggs with Collards and Cheddar Garlic Grits
From Asparagus to Zucchini, Madison Area CSA cookbook
also found recipe online here

First of all, I'd change the to Cheddar Garlic Grits with Collards and Egg because otherwise, I'm thinking of a fritta or an egg bake (apparently different than baked eggs!) when I read that title.  Anywho!  We substituted mibuna for the collards and it worked really well.  Owen didn't eat the greens but Jillian did (yay!) and everyone enjoyed the grits and egg.  I'd make this again!

Baked Eggs with Mibuna and Grits

1 large bunch collards or other greens
1 tablespoon balsamic vinegar
1 slivered garlic clove
1 cup quick cooking grits
1-1 ½ cups grated sharp cheddar cheese
4-6 eggs
Salt and pepper

Wash, stem, chop greens, steam until just wilted, season with vinegar and salt and pepper. Gently cook grits in 3 ¼ cups water with garlic, over low heat after water comes to a boil, about 5 minutes. Stir in cheese and half of the greens. Place grits in greased baking dish, spread remaining greens on top, make slight indentations and crack an egg in each. Sprinkle with salt and pepper, bake 15-20 minutes or until eggs are set.


Grilled Skirt Steak With Vietnamese ‘Chimichurri’
Mark Bittman via New York Times

We decided to try out lettuce cup recipes this season with our baby lettuce heads.  This time, we tried Mark Bittman's (our go-to man) recipe for these steak and chimichurri cups.  The co-op was out of skirt steak so we used tri-tip at the butcher's suggestion.  These were good and I'd make them again but I'll be trying some other lettuce cup recipes out, too.

Grilled Skirt Steak With Vietnamese ‘chimichurri’

Skirt steak, a long slender muscle of near-uniform thickness (it's actually the diaphragm), has intensely rich flavor. It's also just about the easiest piece of meat to cook: four minutes a side over high heat and you've got medium-rare.
 
1 tablespoon nam pla (Thai fish sauce)
1 teaspoon cracked or coarsely ground black pepper
1 teaspoon sugar
1 small Thai chili, stemmed and seeded, or 1/2 teaspoon crushed red chili flakes, or to taste
2 tablespoons fresh lime juice
2 teaspoons chopped garlic, or to taste
2 medium-to-large shallots, chopped
1/2 cup washed, dried and chopped mint or Thai basil
1/2 cup washed, dried and chopped cilantro
Salt and pepper
1 1/2 pounds skirt steak
12 or 16 leaves Boston, red-leaf or green-leaf lettuce, washed and dried.
 
Start a charcoal or wood fire, or heat a gas grill. Fire should be moderately hot. Grill rack should be no more than 4 inches from heat source. Combine first 7 ingredients in a blender or food processor and purée; add herbs and pulse to chop finely, but not quite purée. Taste and adjust seasonings as you like. Sprinkle steak with salt and pepper and grill 4 minutes a side. Cut into 4 steaks, arrange over lettuce, and serve with sauce. Or cut into strips, wrap each strip in a lettuce leaf, top with a bit of sauce and roll up.
 
 
Warm Crab Salad with Garlic Pea Vine

Oh crab, how I love you!  This was a great way to use pea vine.  We often saute the pea vine and serve it with eggs but it seems like we have so much this year!  This recipe is a keeper - as long as I can find money in the budget for the lump crab.

Warm Crab Salad with Garlic Pea Vine

1 pound fresh lump crab meat
1 pound pea shoots (we used one big bunch but 2 would have been better)
1 tablespoon canola oil

Seasonings:
3 tablespoons minced scallion greens (we used garlic scapes in place of the scallions and garlic)
1-1/2 tablespoon minced fresh ginger
1-1/2 tablespoons minced garlic

Dressing:
4 tablespoons low-sodium soy sauce
1-1/2 tablespoons sugar
3-1/2 tablespoons clear rice vinegar
2 tablespoons water
2 tablespoons rice wine or sake (we used some sweet white wine we had around)
2 red bell peppers, diced

Remove any shells or cartilage from crab meat. Cut pea shoots into 4-inch long sections. Mix Seasoning ingredients together. Prepare Dressing.

Heat a wok or skillet, add 1 teaspoon of the oil, heat. Add pea shoots, toss for 30 seconds, then add 1 tablespoon of rice wine. Cook 30 seconds more until leaves are slightly wilted. Remove, drain and arrange on serving plate.

Reheat pan, add remaining oil and heat. Add Seasonings and toss 15 seconds. Add red peppers and remaining rice wine and toss about 1 minute.

Add Dressing and heat to boiling, then add crab meat and toss lightly over high heat for 1 minute. Arrange crab mixture over pea shoots and serve hot or at room temperature. Serves 6.

Wednesday, May 23, 2012

Spring Green Tart

Oh man, this recipe is a keeper.  Absolutely delicious and even the kids ate it (well, Owen picked off the greens).  And it uses that crazy hon tsai tai.  The combination of the chard and hon tsai tai was nice but this could easily be made with just the chard or just the hon tsai tai (or another leafy green!).  I used Dufour Pastry Kitchens Puff Pastry (found at Seward Co-op) and it tastes like homemade.  Maybe someday I'll get around to making my own puff pastry but until then, I'll be buying this brand!

Spring Green Tart

Spring Green Tart
via the Kitchn, original source erin's kitchen

1 frozen sheet all-butter puff pastry
2 egg yolks
1/2 large bunch of rainbow chard, center ribs removed, roughly chopped
one bunch trimmed and roughly chopped hon tsai tai
3 bunches sliced green garlic (I used one bunch of green garlic and one bunch of potato onions)
1 tsp. thyme leaves (I forgot about this...)
1/2 c. low-fat cottage cheese
1 tbsp. cream
6 oz. goat cheese (I used at least 8 oz... I like my goat cheese!)
salt/pepper
olive oil

Preheat oven to 400.

Defrost puff pastry and unroll it on a lightly oiled baking sheet. Score a 1/4-inch border around the edge of the pastry. Mix one egg yolk and a splash of water, and brush along the border. Chill the pastry in the freezer until ready to use.

Heat a large saute pan over high heat, and add tbsp. olive oil. Then add thyme and 1/2 the green garlic, and saute for a few minutes. Then add the chard and the han tsai tai, tossing in oil to help them wilt. Season with salt and pepper. Cook, stirring frequently, until greens are tender. Set aside to cool.

Mix cottage cheese, remaining egg yolk, cream, splash of olive oil, salt and pepper together in a bowl (If you'd like it really smooth, you can puree in food processor- I didn't do this and it didn't seem chunky after baking).

Spread cottage cheese mixture on the puff pastry inside the scored border. Crumble half of the goat cheese over the cottage cheese, arrange the cooked greens on top, and sprinkle with the rest of the green garlic. Then distribute the last of the goat cheese on top.

Bake the tart for 20-25 minutes, until cheese is bubbling and crust is golden brown. Cool a few minutes and serve.